I wanted to provide some backstory to this post with the pic below because it is very telling. If you look closely you’ll see that Michael is holding a 9-month...
Feb 1, 20185 MINUTES READ
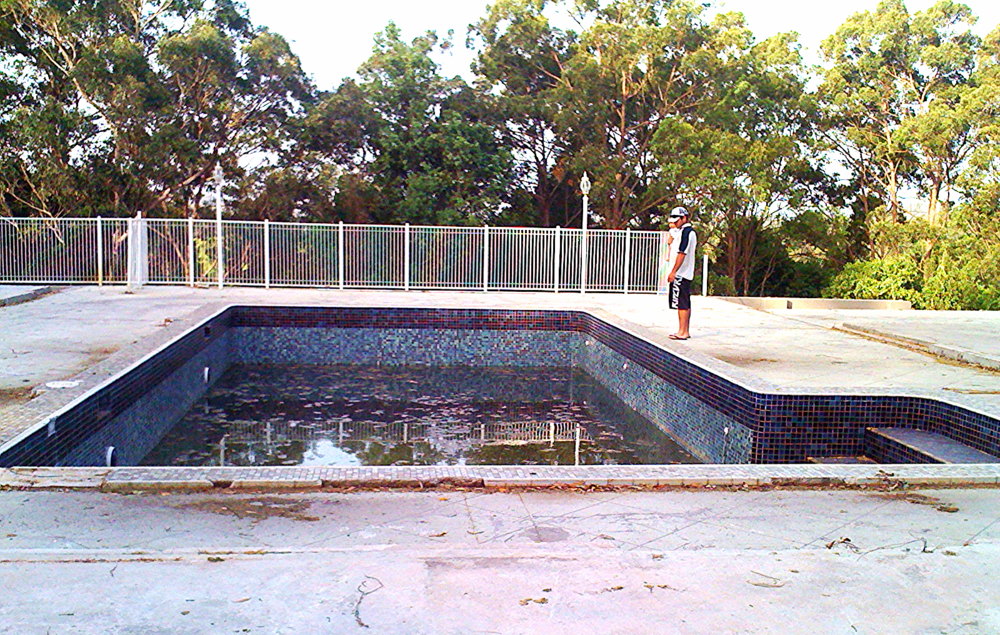
I wanted to provide some backstory to this post with the pic below because it is very telling. If you look closely you’ll see that Michael is holding a 9-month old Paddy. Well, Paddy turns 9-years old in 6 weeks. In this pic, we were 27 years old, with a mountain of work ahead of us and big dreams. What we’ve proved to ourselves is that despite all odds, we had the perseverance and resilience to realise them. It’s worth reading about the history of this house hereto really gain an understanding of this space.
I was nervous committing to a black house. I loved the idea of it but I’d never seen a black house on this scale before and because this house was unlike any other home I’ve worked on or even, seen, I had nothing to compare it to. I was concerned that because the house is so large that it would be too stark but I was never concerned enough to not take the risk. I decided to trust my vision. The idea being that that there was enough greenery, brick, and glass to absorb the black and more than that, to complement it. Then there was the fact that there was no other colour that I wanted to bother trying. So black it was and black it is and the black is fab.
One thing I knew for sure is that it had to be a black black. I was adamant that when the sun shone on the colour that no one could ever call it charcoal. Funnily, the specific colour I went with is called Resene ‘Blackest Black’ and I actually think that’s exactly what it is.
What you should know is that all paint looks different depending on the surface it’s used on. This colour could easily appear darker again on a different type of material. One of the other reasons that the black does work so well is due to the type of cladding we’ve opted for. It’s a is rough sawn plywood. More specifically, it’s Shadow Clad Ultra from Carter Holt Harveyand we’ve broken it up with treated pine battens.
I frequently seek inspiration from commercial buildings and in this case my inspo came from the Rodd and Gunn shop on Hastings St. Noosa Heads. Next time you walk past it you’ll be all like, “oh yeah right, I get it.” The way the black is broken up by the large, white box window frames provides a sort of coastal influence. Michael was doing a subtle push (not a strong push) for black frames but once he saw the white, he totally got it.
One of the most glorious features of this house is the front facade and the fact that you can see from the front right through the breezeway to the pool and trees beyond. Michael wrestled for months over what type of doors to include in this breezeway. It seems like these glass sliders would have been an obvious choice but they weren’t. A&L Windows and Doors provided all of our windows and glass doors. They were super efficient, enthusiastic and so easy to deal with.
Michael made that impressive timber entry door out of Spotted Gum from Wilson Timbers. It’s a monster and we love it. There’s just something very luxurious about a large, grand entry door. To give you your bearings, if you head right from the entry you walk into our living/kitchen/dining (not finished) and if you head left you walk through the breezeway and to the new part of the house (bedrooms, bathrooms, brick tower). I like to call it the West wing.
Ahhhh the brick tower. It involved a lot of bricks and a lot of bricks but it is absolutely key to the success of this house. The brick is PGH Bricks, Black and Tan(which retail at ABC Bricks for Gold Coasters) with white mortar from the White Cement Co. What’s in that tower? Nothing yet apart from walls, floors and lighting. Its a bit of an empty shell. The lower floor is to be the rumpus room which will include an all white steel spiral staircase leading up to our home office. Not that we’re short on space in the house but I do look forward to having a dedicated office space so that Michael no longer has his paperwork sprawled across our dining table. Thats a reveal for a another day, like when there’s something to reveal.
On a side note, despite our neglect that grass in the front courtyard is still green and lush. It’s a new type of Buffalo called New Frontier Buffalo from All Turf Solutionsand I can affirm that if you need a hardy grass then this is your guy.
I should point out at this point, that the gigantor pool came with the gigantor foundations of the property as we purchased it 8 years ago. No sane minded person would install a pool this size for residential purposes because well, nobody needs a pool his size. Michael had it filled before we’d even moved into the initial stage of the reno so that he could use it whilst he built. There is also no way we would spend the money to tile it in mosaic tiles but we’re certainly not complaining that it already was.
Are you wondering where our pool fence is? It wasn’t installed when these photos were taken but we installed a glass fence right where that door opening is in the pic above, with a return right in line with the two fixed glass panels on either end of the opening (wish I had a pic).
Those sun loungers above are from Ikea and I purchased the foam toppers that were designed to go with them but had them covered in outdoor fabric from 3Beaches. This fabric is SO impressive. The chairs sit in full sun and rain day and night, don’t deteriorate, and dirt just wipes off. Not only that but it doesn’t feel like most outdoor fabrics. It’s soft which means you can use it indoors, which is especially handy if you have kids and pets who love to run amok on your sofa.
The decking (pic above) is spotted gum from Wilson Timbers and in fact is a nifty little system called DeckmateDIY. It’s is a concealed fix decking system, which basically means there are no fixings through the face of the timber, creating a more streamline look. It also helps to avoid common decking issues such as end splits, popping nails, and deck rot. Once Michael got his head around the idea of a new decking system, with the help of our Dads, he was able to smash out the deck, super efficiently.
Let’s talk about this landscape design. Dave Franklin from Franklin Landscaping, designed our pool surrounds and front courtyard. We told him we wanted a Palm Springs inspired look hence the white concrete pads surrounded by artificial turf. The concrete is Geostone from Holcim and we went with the colour Tilga. I was concerned about the colour being too white because I can’t stand the glare a white concrete throws but the grass helped break it up and soften it and with it, the Palm Springs look was definitely achieved. The good guys from OzGrind painstakingly grinded all of the concrete coping around the pool as well as the concrete slabs. To do it, we had to empty our 1 billion litre pool for the second time within the reno, which hurt but there was no way around it.
All of our plants came from Lake Devon Nursery which is a wholesale nursery located in Upper Coomera on the Northern end of the Gold Coast. Dave (Franklin) had been liaising with the team about the type of plants we needed and it was the only area of this renovation that I was happy to stay out of. I know little about plants and knew to stay out of those discussions and let the pros do their thing, which meant that those plants were like a surprise birthday present. When the truck pulled up onsite, containing all of our the plants I could have squealed with excitement. I felt my heart skip a bit and relax at the same time because if you’re planting plants it means you’re nearly there, that you’ve made it and for us, we’d waited 8 years to create this side of the house so it was a HUGE, defining moment. We were so close.
Now to the contentious artificial turf. Some love it, some hate it but I suspect that many whom hate it associate it with a putt putt course and aren’t familiar with the advancements in the artificial turf world. My feelings towards it come from logic. I LOVE it in an application where real turf would be very difficult to maintain ie. around a pool because or in areas that get poor sunlight and water. In this case, real grass wouldn’t survive the chlorine and we would never entertain the idea of trying to mow around those concrete pads. Does it get hot? Yup, but that’s the lesser of two evils in this case. Our giant pool requires enough maintenance that we don’t want to be dedicating any time to the grass around it and this way we don’t have to. Our particular product came from Turf Green. We’ve never looked back.
The plants in the poolside garden above were selected by Dave Franklin and his team under similar logic to the grass. These are hardy, drought resistant plants that won’t blink an eye being splashed with chlorinated water every day. This garden has gone gangbusters since this pic was taken, although I suspect that the cactus is the cause for a few deflated inflatable pool toys.
It’s funny, I showed resistance to the planter boxes and bench seat base being built from brick. My theory was that the brick here would take away from the brick tower and I was also concerned that the brick would take away from the cladding and overall look I was trying to achieve. Michael pushed for it. I conceded because I didn’t have a better alternative and I’ll admit it, it totally works. Its the same brick used on the tower (PGH Black and Tan).
I LOVE these images of our exterior but no pic can reflect the feeling of a space and this house emits seriously good vibes. It absolutely helps that we’re surrounded by lush, mature greenery, the sound of birds and the fact that there’s something very resort-like about this home. It’s calming.
Ps. there is a reason we are only showing you one side of the house and it’s because the other side isn’t done. Lordy, I wish it were but it’s not. It’s the original side of the house that we built 8 years ago so it’s very, very liveable and inside is decorated and has a good vibe despite the fact that it’s missing cupboard doors and has some unpainted surfaces etc. The exterior however is no presentable so y’all will just have to wait for that just as we have to.
In the coming weeks we’ll be doing an Instagram live tour of the house so stay tuned for that and get your questions ready.
This is the next stage of our Berry House Project. You can see the complete first stage here and read all about the design and transformation featured in Inside Out Magazine here.
A stunning coffee table book for DIYers, interior design lovers, as well as vanlife and tiny homes enthusiasts, This Old Van is the complete how-to guide to plan, renovate and style your own vintage van to give it a second life. We have received countless emails from keen renovators around the world asking for advice on […]
Mackerel House | Our latest bathroom interior design project is the beginning of a much more substantial renovation, set to take place in the second half of 2023. Images: Mindi Cooke.
After 4 years under our house patiently waiting for her moment in the sun, our 1970’s vintage Viscount, Goldie was our chance to take what we learned from our previous 4 vans and create something truly just for us. Goldie’s colour scheme feels like a step back in time and pays tribute to […]
Read about the design and renovation of Berry House, as featured in Inside Out Magazine’s October 2022 issue here. Interior Design and Decoration: Cedar and Suede Architect: Michael Ford for Shaun Lockyer Architects Builder: J.H. Dixon Builders Images: Mindi Cooke
Originally named ‘Blenheim House’, this majestic New Farm home was originally constructed circa 1887. She’s a special part of Brisbane’s history and encompasses everything I love about a home; history, character and mood. Below, we show you round one of a two-part renovation that was in fact carried out way back in 2019. Round one […]
Design Trends
Projects
Uncategorized
How to create an effective entertaining area
The temperate Australian climate makes outdoor entertaining particularly appealing and when building or renovating, we are placing more and more emphasis on our outdoor areas with view to creating spaces...
Oct 24, 20175 MINUTES READ
The temperate Australian climate makes outdoor entertaining particularly appealing and when building or renovating, we are placing more and more emphasis on our outdoor areas with view to creating spaces ideal for entertaining. Together with Lend Lease, we’ve outlined our tips on how to transform your outdoor deck or patio into the ultimate entertaining space.
Zone your space
Creating zones within your entertaining space is key. Multiple zones allow your guests to use the space with more freedom and fluidity and visually, it makes for a more interesting and layered scene. In addition to your dining table, you may wish to include more relaxed, ‘loungy’ seating areas scattered around your space that promote conversation. A stand-alone bar cart or drinks table is always a good addition. It has replaced the built-in bar that was popular in the 80’s and allows guests the freedom to help themselves.
Layer up for visual warmth and comfort
Your outdoor space should be an extension of your interior and adding layers is as important in your exterior as it is in your interior. Lay outdoor rugs, which help anchor the furniture and soften the hard surfaces. Advancements in the manufacturing of outdoor rugs means they are starting to mimic indoor rugs in terms of look and feel (many people even purchase outdoor rugs for indoor use). Upholstered seating, scatter cushions, and throw blankets also help add colour, softness and life to an outdoor space as well as significantly contribute to the comfort level, encouraging your guests to relax. Plants add another dimension of visual softness and layering them in various species, sizes and using a range of different pots creates a lush and leafy oasis.
Utilise outdoor materials
Working with materials that will withstand the elements is key to an outdoor space that will stand the test of time. The cost of good quality outdoor furniture can often be an investment due to the manufacturing processes involved to ensure the furniture’s resistance to the weather. For this reason, you may want to purchase these items over a period of time to avoid the costs being a burden. Outdoor furniture can come in a range of materials so your best bet is to always ask the supplier straight out so that you know what you’re paying for. Similarly, stick to a specific outdoor fabric for your upholstery and soft furnishings. There’s no reason that you can’t borrow from your indoor collection when entertaining but make sure you return them indoors at the end of the day/night else the fabric will be subject to fading and mould spores.
Stick to routine maintenance
Maintaining your outdoor space through regular upkeep is key to its frequent use. Cleaning your BBQ after each use will prevent excessive grime build-up and means it’s always ready for action. Similarly, regularly blowing or sweeping the leaves of the ground allows for spontaneous entertaining and on a practical note, prevents the leaves (especially gum leaves) from staining the decking or tiles. Finally, make sure the plants you purchase are suited to the conditions of your outdoor space and tend to them regularly to prevent casualties, which can be costly to replace.
This is the next stage of our Berry House Project. You can see the complete first stage here and read all about the design and transformation featured in Inside Out Magazine here.
A stunning coffee table book for DIYers, interior design lovers, as well as vanlife and tiny homes enthusiasts, This Old Van is the complete how-to guide to plan, renovate and style your own vintage van to give it a second life. We have received countless emails from keen renovators around the world asking for advice on […]
Mackerel House | Our latest bathroom interior design project is the beginning of a much more substantial renovation, set to take place in the second half of 2023. Images: Mindi Cooke.
After 4 years under our house patiently waiting for her moment in the sun, our 1970’s vintage Viscount, Goldie was our chance to take what we learned from our previous 4 vans and create something truly just for us. Goldie’s colour scheme feels like a step back in time and pays tribute to […]
Read about the design and renovation of Berry House, as featured in Inside Out Magazine’s October 2022 issue here. Interior Design and Decoration: Cedar and Suede Architect: Michael Ford for Shaun Lockyer Architects Builder: J.H. Dixon Builders Images: Mindi Cooke
Originally named ‘Blenheim House’, this majestic New Farm home was originally constructed circa 1887. She’s a special part of Brisbane’s history and encompasses everything I love about a home; history, character and mood. Below, we show you round one of a two-part renovation that was in fact carried out way back in 2019. Round one […]